
The Cricut water bottle is more than just an accessory for hydration, as it’s a great way to show off your creativity and personal style. If you are interested in learning how to make a water bottle with the Cricut machine, I have prepared this blog post just for you. In this blog, I will first share with you 3 unique water bottle projects that are very popular and expensive in the market, which I made myself with some supplies and a Cricut machine.
Next, I will show you step-by-step how you can make such bottles in only a short time. Once you learn it, you will be able to make many things like bottles, glasses, and cups. Now, I can’t wait to start this guide.
3 Most Popular Cricut Water Bottle Ideas
The following are the trending water bottle ideas that you should try to show your creative side. Bottles are very easy to style and don’t take much time. If you are a person who loves exploring new ideas, you are going to love these three ideas.
- Berg Water Bottle
Whether you’re a working professional or in college, you can make this project with your Cricut. This is a water bottle from a very popular brand, Berg, which you can prepare yourself at your home. I made this because I had to give it to my clients at the crafting office. To make this, buy a plain water bottle, cut out several permanent vinyl berg designs with a Cricut, and attach.
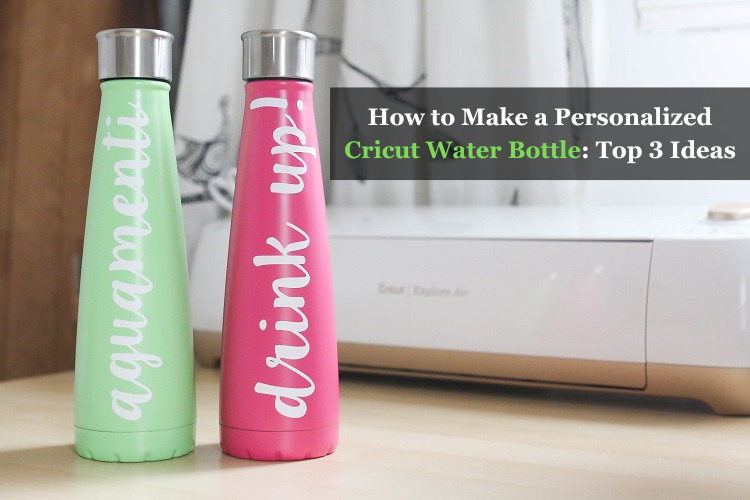
- Cricut Water Bottle With Vinyl
My daughter wants to serve the country as a professional nurse, and I keep giving her small gifts to keep her motivated. She loves to personalize things, so I gifted her a personalized water bottle. To make this, I need a Cricut machine and vinyl. You can also make this by simply cutting your design on vinyl.
- Sports Water Bottle
If you are also a sports lover, like to go to the gym and also do workouts. It is your responsibility to keep yourself hydrated, and for this, you need a water bottle that will excite you. This Cricut allows you to personalize a plain water bottle according to you.
To make this first, go to the Design Space, create a stencil design, choose the correct material setting, and cut it out.
How to Make a Water Bottle With Your Cricut Machine?
After sharing my top Cricut bottle ideas with you, I’ll now walk you through the complete step-by-step process of how to make a custom Cricut water bottle.
Step 1: Collect All the Tools and Supplies
The first thing you have to do is gather all the essential materials you will require for your project.
- A Step by step instruction
- Cricut cutting machine
- Permanent adhesive vinyl
- Transfer tape
- Cutting mat
- Scraper tool
- Blank water bottles
- A computer with Design Space installed
- Downloaded SVG file
Step 2: Upload Your SVG File on the Design Space
First, we connected our Cricut machine to our computer and opened the Design Space.
- Now, click on the New Project on this software.
- After this, press the Upload icon on the left-hand corner of your screen.
- Then, browse and find the SVG file from your computer system.
- Next, import the file, write a name and tag for it, and select Upload.
- Here, I am making more than 3 Cricut water bottle designs, so I have selected multiple designs.
- Now, measure your bottle and resize your design accordingly using the edit tool.
Step 3: Choose the Appropriate Material Settings
The design we will make on the bottle must be curved; for this, click on the design and use the curve tool. Once everything is prepared according to plan, click on the Make It option.
Now, you will be on a new page, mirror the design here, and click on Continue.
Subsequently, set the material as permanent vinyl and maintain the default pressure setting.
Step 4: Cut the Design
Now leave your computer as it is, take your permanent vinyl, and lay it on the Cricut mat with the shiny side down. And after that use the roller to fit it correctly.
Moreover, press the Load button on the machine and load the mat. Then go back to your computer and click on the Continue option. After this, the Go button of your machine will start flashing; click on it.
Step 5: Weed Out Your Design & Prepare a Bottle
Once the design is cut, click the unload button on the machine, unload the sheet, and remove the sheet from the mat. Now, use the weeding tool to remove negative parts from the design.
Finally, clean your bottle and dry it using your towel.
Step 6: Apply the Design to Your Bottle
Furthermore, cover the vinyl design with a small piece of transfer tape and peel away the backing paper.
Finally, apply the vinyl to the water bottle using a scraper tool. This will look straight on our curved water bottle. After this, use the scraper and run it on the bottle.
Final Words
Personalized bottles can be used as gifts for family and friends or for corporate, graduation programs, and other special events. And the bottle of your choice will not be available in the market, even if it is available, the price will be very high. And that’s the problem the Cricut water bottle solves. You can make it as per your requirement with Cricut; it can be either permanent or temporary.
For more information visit: cricut.com/setup
cricut.com/register
cricut easy press 3 setup
how to set up cricut easypress 3

Leave a comment